Installation
Description
How to install Web and Mobile as standalone or for your existing Plone site
Introduction
This document tells how to install Web and Mobile as standalone or to the existing Plone CMS site.
Supported operating systems are all operating systems which run Plone
- Linux
- OSX
- Windows (note: for Windows complete instructions are not available)
Prerequisites
The following software stack is needed in order to install and run mFabrik Web and Mobile
- GCC compiler
- lxml / libxml2 libraries
- Python Imaging Library
- Internet connection is needed during the installation process
Installation of fresh site
These instructions apply if
- you do not have an existing Plone site
- you want to test Web and Mobile locally
- For Plone versions 4.x
Ubuntu
Python 2.6 needed, see Python installation instructions below if your Ubuntu distribution does not support Python 2.6 as the default Python interpreter.
sudo apt-get install python2.6 python-imaging wget build-essential python2.6-dev python-setuptools
easy_install ZopeSkel
paster create -t plone3_buildout gomobile # Will create folder called "gomobile"
# Choose Plone version 4.0.1, set your admin password and just hit enter to otherq uestions
cd gomobile
wget http://plonegomobile.googlecode.com/svn/gomobile.buildout/gomobile.plone-4.cfg
mv gomobile.plone-4.cfg buildout.cfg # Rename to buildout.cfg
python2.6 bootstrap.py
bin/buildout
bin/instance fg # Start Plone in foreground mode
If your system doesn't have lxml==2.2.6 installed, you can set it up in your virtual environment (no root access required): http://digita.la/2010/6/2/compiling-lxml-libxml2-libxslt-for-a-virtualenv
If you are using virtualenv, and it has no PIL, just do:
easy_install http://dist.repoze.org/PIL-1.1.6.tar.gz
OSX
First install XCode and Macports.
The following Terminal spell installs and starts Web and Mobile, after installing Macports
sudo port install python26 py26-pil wget #make sure to install and use python26 from macports
easy_install ZopeSkel
paster create -t plone3_buildout gomobile # This creates gomobile folder
# Choose Plone version 4.0.1, set your admin password and just hit enter to otherq uestions
cd gomobile
wget http://plonegomobile.googlecode.com/svn/gomobile.buildout/gomobile.plone-4.cfg
mv gomobile.plone-4.cfg buildout.cfg # Rename to buildout.cfg
python2.6 bootstrap.py
bin/buildout
bin/instance fg # Start Plone in foreground mode
Windows
You need MingW compiler enabled.
- Manually install Plone 4
- Install lxml for Python used with Plone 4
- Edit buildout
- Run buildout
- etc.
Setting it up
Go to http://localhost:8080.
Follow Create a new Plone site link and create a site with the following add-ons checked.
- Username/password is admin and defined in your buildout.cfg. buildout.cfg option affects this option only during the installation time and you can change the password in the future through the web interface.
- Check Go Mobile
- Check Go Mobile Default Theme
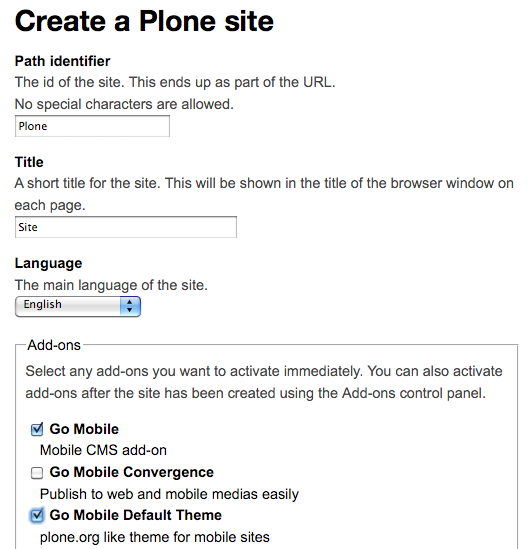
Tick these add-ons
Modifying your local hosts file
Hosts file
is your operating system text file which
allows you to manually add DNS names on different
IP addresses. For testing and developing Go Mobile for Plone you
need to assign another name for your local computer, also
known as localhost or by IP address 127.0.0.1.
After modifications, the following URL will render in web mode (like before modification)
..but the following will result to the mobile mode
...and the following page is laoded by mobile simulator
Adding required lines
Add the following line to hosts file (note that on UNIX you need to use sudo):
127.0.0.1 m.localhost preview.localhost
Installation for existing Plone sites
These instructions apply if you want to mobilize an existing Plone site.
Plone 4 buildout.cfg changes
Edit buildout.cfg and add lines:
extends =
        ...
        http://good-py.appspot.com/release/dexterity/1.0b2?plone=4.0.1


eggs =
        ...
        mfabrik.webandmobile
Plone 3 buildout.cfg changes
Edit buildout.cfg and add lines:
extends =
        ...
        http://good-py.appspot.com/release/dexterity/1.0b2?plone=3.3.5

eggs =
        ZPublisherEventsBackport
        mfabrik.webandmobile
Then follow the instructions above how to modify hosts file and install add-ons
in the site setup.
Trunk version for developers
This is needed if you wish to develop Web and Mobile code base.
Note
Subversion 1.6 or later is required, as otherwise Mr. Developer recipes "ignore certificate errors" does not work.
Modify buildout to include Web and Mobile trunk version sources
The following buildout extends are available for you:
- Plone 3 anonymous
- Plone 3 commiter
- Plone 4 anonymous
- Plone 4 commiter
See gomobile.buildout project for available URLs and files.
Add Web and Mobile snippets to buildout.cfg as described below:
[buildout]

 parts =
    ...
    ${gomobile.config:parts}


 # Need to refer to buidout.cfg extension which lives on Google Code servers.
 extends =
    http://dist.plone.org/release/4.0/versions.cfg
    http://good-py.appspot.com/release/dexterity/1.0b2?plone=4.0
    http://plonegomobile.googlecode.com/svn/gomobile.buildout/gomobile.trunk.anonymous.cfg

 extensions = mr.developer

 eggs =
    ${gomobile.config:eggs}
Note
For trunk, use eggs = ${gomobile.config:eggs} instead of eggs = mfabrik.webandmobile
If you want to run unit test also include:
[test]
recipe = zc.recipe.testrunner
defaults = ['--auto-color', '--auto-progress']
eggs =
   ${instance:eggs}
You can also make sure that no release versions are included in development buildout:
rm -rf eggs/gomobile.*
rm -rf eggs/mobile.*
Different trunk version buildout options are
- http://plonegomobile.googlecode.com/svn/gomobile.buildout/gomobile.plone-4.trunk.cfg
- http://plonegomobile.googlecode.com/svn/gomobile.buildout/gomobile.plone-4.trunk.commit-access.cfg
- (Plone 3) http://plonegomobile.googlecode.com/svn/gomobile.buildout/gomobile.trunk.commit-access.cfg
- (Plone 3) http://plonegomobile.googlecode.com/svn/gomobile.buildout/gomobile.trunk.anomymous.cfg
You can find available versions here.
gomobile.trunk.cfg is an buildout extension file defining trunk package versions using Mr. Developer buildout extension. You do not want to include this file directly, as depending on the commit access and Plone version you need to get one of the options above.
Files ending with commit-access.cfg and anonymous.cfg are alternative config files extending gomobile.trunk.cfg with the setting of HTTP or priviledged HTTPS checkout protocol.
Note
Dexterity (new Plone system) component version configuration is used as a base to have a good known set of version for Go Mobile for Plone.
Running buildout with Mr. Developer
You can checkout the all code after accepting the certificates using steps above.
Step 1
Activate your Python 2.4 virtual environment (depends on how your Python is installed):
~/python2.4/bin/activate
Start Plone
Run:
bin/instance fg
...and hope there was no version incompatibilities between products.
Uninstall
To remove Web And Mobile from your site, uninstall all the following add-ons
- Go Mobile
- Go Mobile Convergence
- Go Mobile Default Theme
Note
Uninstallation will lose mobile content settings on all content.
Running automatic test suite
After you have succesfully launched Plone, you can run automatic Go Mobile test suite which includes unit and functional tests. This will guarantee that your operating system libraries and Python module set is compatible with Go Mobile.
To run test suite (using zc.recipe.testrunner):
bin/test -m gomobile* -m mobile*
After test suite completes, it should report zero failures:
Total: 119 tests, 0 failures, 0 errors
Troubleshooting
lxml too old
If you get start up error:
zope.configuration.xmlconfig.ZopeXMLConfigurationError: File "/home/moo/code/gomobile3/parts/instance/etc/site.zcml", line 15.2-15.23
    ZopeXMLConfigurationError: File "/home/moo/code/gomobile3/eggs/Plone-3.3.5-py2.4.egg/Products/CMFPlone/configure.zcml", line 116.4-116.60
    ZopeXMLConfigurationError: File "/home/moo/code/gomobile3/eggs/gomobiletheme.basic-0.9.3-py2.4.egg/gomobiletheme/basic/configure.zcml", line 16.2-16.39
    ZopeXMLConfigurationError: File "/home/moo/code/gomobile3/eggs/gomobile.mobile-0.9.4-py2.4.egg/gomobile/mobile/configure.zcml", line 19.4-19.34
    ZopeXMLConfigurationError: File "/home/moo/code/gomobile3/eggs/gomobile.mobile-0.9.4-py2.4.egg/gomobile/mobile/browser/configure.zcml", line 24.4-29.10
    ImportError: No module named lxml.html
... your lxml library is too old.
Possible workaround
- Update system-wide libxml2 and libxslt
- Create python virtualenv with updated lxml
More info
- http://svn.plone.org/svn/collective/collective.developermanual/trunk/source/troubleshooting/exceptions.txt (search for System lxml too old)
This container already has a Virtual Host Monster
You get this when trying to create fresh Plone 3 site Web and Mobile:
  File "/home/moo/code/gomobile3/parts/zope2/lib/python/zope/interface/adapter.py", line 535, in subscribers
    subscription(*objects)
  File "/home/moo/code/gomobile3/parts/zope2/lib/python/OFS/subscribers.py", line 116, in dispatchObjectMovedEvent
    callManageAfterAdd(ob, event.object, event.newParent)
  File "/home/moo/code/gomobile3/parts/zope2/lib/python/OFS/subscribers.py", line 149, in callManageAfterAdd
    ob.manage_afterAdd(item, container)
  File "/home/moo/code/gomobile3/parts/zope2/lib/python/Products/SiteAccess/VirtualHostMonster.py", line 126, in manage_afterAdd
    raise BadRequest, ('This container already has a %s' %
zExceptions.BadRequest: This container already has a Virtual Host Monster
Reason: bug in Plone / Zope. For some reason, it fails to create fresh ZODB database (Data.fs file) properly.
Workaround:
- Remove mfabrik.webandmobile from buildout
rm var/filestorage/Data.fsto clear broken database- Run buildout
- Start Plone
bin/instance fg - Stop Plone, press CTRL+C
- Add new Zope admin user
bin/instance adduser admin admin - Renable mfabrik.webandmobile in buildout
- Run buildout
- Start Plone
Unable to preview
If you get this error when opening the preview:
Unable to connect

Firefox can't establish a connection to the server at preview.localhost:8080.
You need to set up /etc/hosts file as explained in the installation instructions.